


Explore by Category:
Product
Introduction to Alokai — a quick ‘getting started’ guide

Alokai is rather a complex solution with a lot of possibilities. Learning all of them can take some time. In this article, I’ll try to explain all its crucial concepts in a few minutes to prove that it’s all you need to start playing with Alokai .
What is Alokai?
Alokai is a headless and backend-agnostic eCommerce Progressive Web App written in Vue.js. The fact that it uses headless architecture allows Alokai to be connected with any eCommerce platform, so it can be a frontend PWA for Magento, Shopify, BigCommerce, WooCommerce, etc.
It’s a very popular Open Source project with a strong and growing community.
Key features of Alokai:
- being platform-agnostic
- focus on performance
- mobile-first approach
- cutting-edge tech
- no limitations in theming and customization
- being Open Source with MIT license
- great developer experience
- out of the box Server-Side Rendering (for SEO)
- offline mode
Here is a GitHub repository.
How does Alokai connect with backend platforms?
Alokai manages to be platform agnostic thanks to the vue-storefront-api and dedicated API connectors for eCommerce backend platforms. The data format in vue-storefront-api is always the same for any platform, which means no matter which eCommerce backend you use, your frontend remains the same — without any changes.
It’s a great strategy for migrations since you can easily migrate from one platform to another (or from one version to another, e.g. Magento 1 -> 2) without touching your frontend.
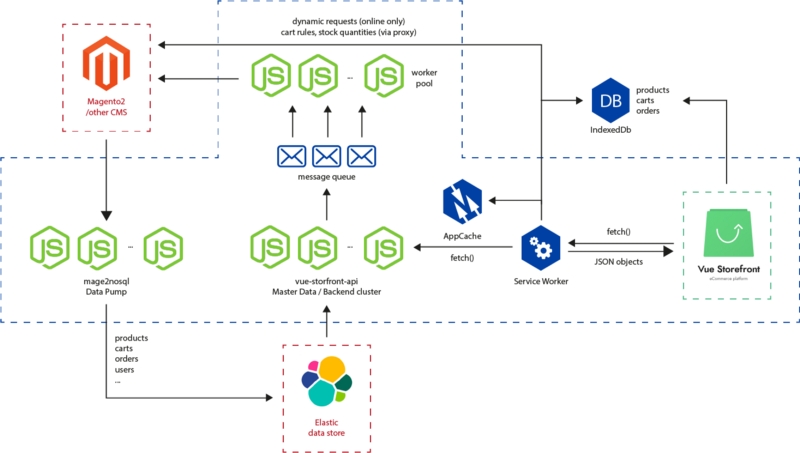
The API connector works in two phases:
- data pump (on the image mage2nosql ) pulls static data (catalog, orders etc) from your eCommerce platform to Alokai ElasticSearch and changes its format to the one consumed by vue-storefront-api. After pulling the data, you can display your product catalog in Alokai. After pumping the data into ElasticSearch, it will stay in sync with changes on the backend platform side and update its content.
- worker pool is synchronization of so-called dynamic calls (user sessions, cart rules etc) that can’t be stored in the database and need to be called by vue-storefront-api directly from the backend platform.
While managing these two phases of integration, Alokai can work with your backend platform.
Some of the most popular backend platforms already have their integrations ( Magento 2 , Magento 2 , commercetools , BigCommerce , WooCommerce )
The blue parts on the diagram are responsible for offline cache and will be explained later in the article.
How does it work?
There are 3 concepts you need to be familiar with while working with Alokai.
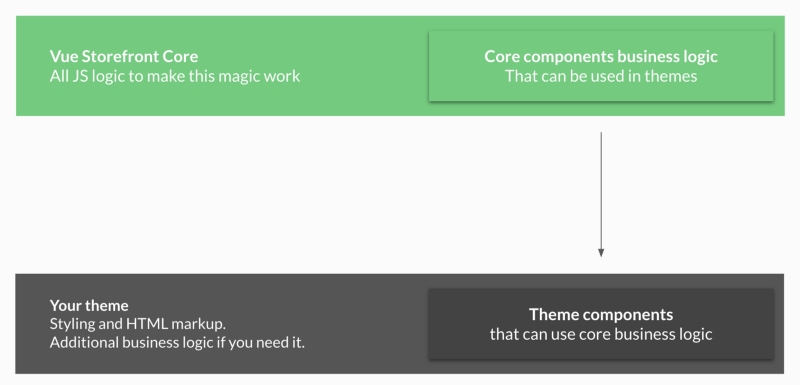
- Alokai Core is the glue for all its features that allow Alokai to work. It contains all the entry points, SSR behavior, builds process, in-app libs and helpers. You shouldn’t touch this folder directly when building your own implementations in order to continue to receive updates.
- Alokai Modules (core/modules and src/modules) is the eCommerce features. Each module is one encapsulated feature (like cart, wishlist, catalog, some third-party integration). You can add/remove/edit these modules as you will and compose your Alokai shop with only the features that you need. They are also used for 3rd party extensions
- Alokai Themes (src/themes) are the actual shop implementations. In themes, you can use and extend all the logic from registered modules/core and add your HTML markup and styles. Alokai provides a fully customizable default theme.
To summarize: your shop is basically a Vue storefront theme that uses features provided by modules. Alokai core glues it all together.
Knowing these three concepts allows you to confidentially work with Alokai and make your own shops.
Useful materials: Alokai project structure .
Installing Alokai
When you want to play with Alokai there are three options:
.jpg?width=768&auto=webp&format=pjpg&disable=upscale&quality=100&dpr=2)
- You can set up the frontend connected to our demo backend platform (best to try out the Alokai).
- You can set up the frontend with your own vue-storefront-api and database dumped from demo.
- You can set up the frontend with vue-storefront-api connected to your eCommerce backend.
To do any of this, simply type "yarn installer" in the root directory of the project and answer the questions in the console. Once the installation is done, type "yarn dev" to run your project (by default on port 3000). No matter what option you choose, you can change the settings in config file later.
Alokai config file
Most of the Alokai configuration (like the active theme, backend API addresses, multi store setup, etc.) is done through its config file which can be found under the "config" folder. The default.json file contains all the default setup.
For your own implementation, you should create a local.json file and include the fields from default.json that you want to override. These two files will be merged in favour of local.json during the build process. If you use the installer to set up your Alokai instance, it’ll generate the proper config files.
Building themes in Alokai
While making themes in Alokai in most cases, all you need to take care of is creating your own HTML and CSS markup. All the required business logic is exposed by the core with its core modules and can be easily injected into any of the theme components.
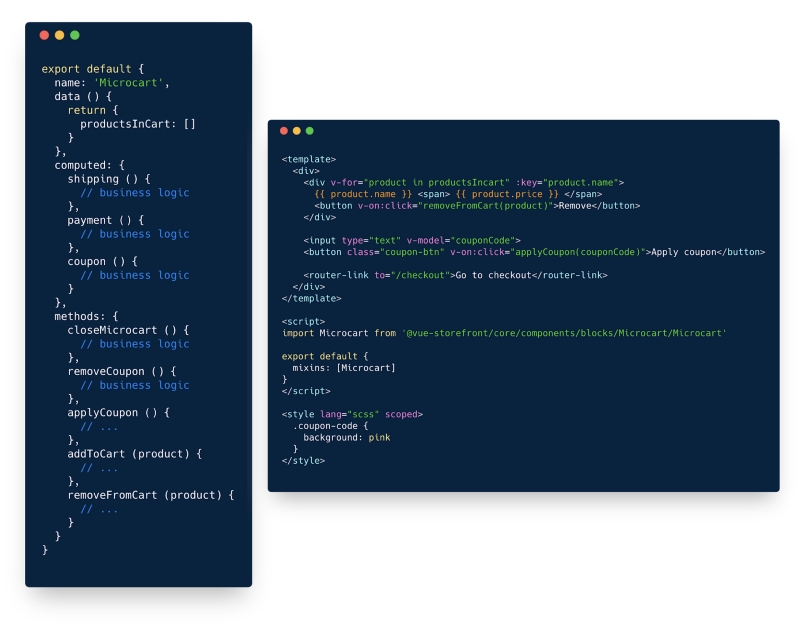
The mechanism of injecting core business logic into themes is very simple. We use Vue.js mixins to keep upgradable business logic in the core. So assuming we have a core Microcart component with business logic like this (left side), we can easily inject it into any of our theme components (right side) just by importing it and adding as a mixin mixins: [Microcart]. This is all you need to make use of core business logic inside your theme. With this approach, we can easily ship updates to all core components without breaking your shop.
The easiest way to create your own theme is to create a copy of the default one, change its name in its package.json file, change the active theme in config/local.json and run yarnto make Lerna linking (which we use for monorepos).
Offline mode and cache
Alokai still works even while the user is offline. We managed to do this by making heavy use of the browser cache.
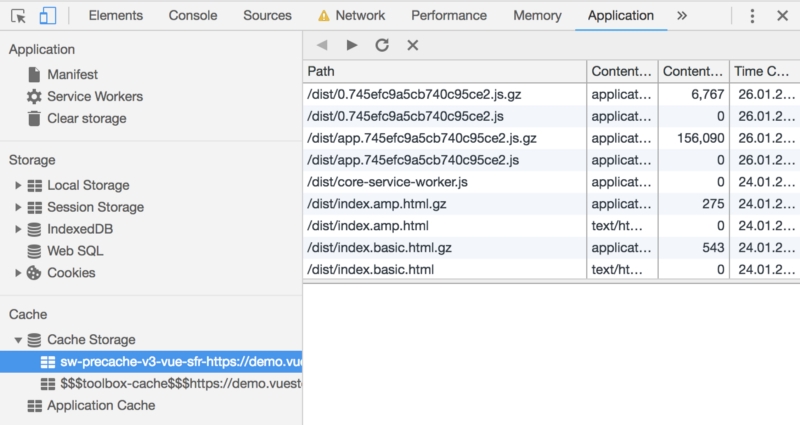
- For the static assets (only prod) we use the sw-precache plugin (config can be found in core/build/webpack.prod.sw.config.js ). They are cached in Service Worker and can be inspected under theApplication tab of your dev tools.
- For the catalog and store data cache we use IndexedDB and Local Storage. We also prefetch products from visited categories so once you enter one, all of its products are available offline. The mechanism of offline storage is located under core/lin./storage.
We use some of the cached data even while the user is online, to display the content instantly. This is why Alokai is so fast.
What else
You may not believe me but this is all you need to know to start working with Alokai! After learning the basics just visit our docs and community slack to dig deeper into the project.
Useful links
- Documentation
- Community slack invitation link
- Project structure explained
- Configuration file explained
- Extending Alokai
- How to contribute
Share:
Share:

More in Product


Ready to dive in? Schedule a demo
Get a live, personalised demo with one of our awesome product specialists.